PolyGlot
by Alan Wrigley
Note: clicking on references from the following list will take you to the appropriate section, whilst clicking on the main headings within the manual will return the view to this list of contents. Clicking on screenshots will open full-size versions in new browser windows.
1 | |
2 | |
2.1 | | |
2.2 | | |
2.3 | | |
2.4 | | |
3 | |
3.1 | | |
3.2 | | |
3.2.1 | | | |
3.2.2 | | | |
3.3 | | |
3.4 | | |
3.5 | | |
3.6 | | |
3.7 | | |
3.8 | | |
4 | |
4.1 | | |
4.2 | | |
4.2.1 | | | |
4.2.2 | | | |
4.2.3 | | | |
4.2.4 | | | |
4.2.5 | | | |
4.2.6 | | | |
5 | |
PolyGlot is a fully multi-tasking application designed to allow fast and easy access to foreign language character sets when using text editors, word processors, DTP packages etc. It can be used just as easily with spreadsheets, databases and indeed any multi-tasking application which accepts character input. A simple description of the software is that it allows you to open a window for any specified language, showing the characters used in that language which are impossible or difficult to obtain normally from the keyboard (for example accented characters in French or umlauted characters in German). Selecting any of these characters with the mouse will then automatically insert it into any document you are working on. The advantages of this over any other method can be easily seen. If, for example, you are typing in a piece of text in German, you would have a PolyGlot window open which would probably show umlauted ä, ö and ü in both upper and lower case, together with the "sharp s" character (ß). The alternative methods are to set your keyboard to the German standard and use the keys which correspond to those characters (but there is no indication on the keyboard which these are), or to use the numeric keypad in conjunction with the Alt key to insert the ASCII codes of the characters you require. Needless to say, both these methods are awkward and require the user to remember obscure codes and keypresses.
PolyGlot is fully customisable, to enable you to tailor each individual copy of the application to your own specific requirements. This means that you can include only those languages, and those characters within them, which you actually need. This facility will be extremely useful in many educational situations, where it might be distracting to have long menus full of languages which are not needed under the particular circumstances. The ability to customise the application also means that you can use PolyGlot as a simple way of selecting from any set of characters, not just those which relate to a specific language. For example, you could have a PolyGlot window open for currency signs, or other symbols. You can also customise PolyGlot to use any of the available alphabets within your Archimedes, though you should be aware that, in order to use these fully, you must have outline fonts or printers which support alphabets other than the standard Latin1.
Each PolyGlot window can have two rows of characters, which you can use for upper and lower case, or any other configuration you choose. These characters can be displayed at one of two sizes. When Normal size is selected, the characters are shown at the usual system font size (as for example file names in directory viewers, or commands typed at the command line). Selecting Large size shows the characters at approximately twice the normal size.
To use PolyGlot, double-click on its application in a directory viewer as normal, and it will install itself on the icon bar. The copy of PolyGlot supplied has been customised to include French, German, Spanish and Symbols on its menu. As mentioned in the introduction to this manual, it is possible to tailor each individual copy of the application to suit your own specific needs, and you should read section 3, Customising PolyGlot, for information on how to do this.
If the copy of PolyGlot being installed has been customised to use an alphabet different from the one currently in force in your computer, a standard error box will ask if you wish to change the alphabet to the one which PolyGlot expects. This will be done automatically if you click on OK, while clicking on Cancel will abort the installation.
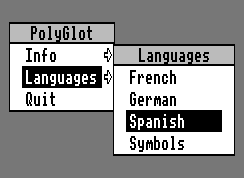
Clicking Menu (the middle mouse button) over the icon bar icon displays a menu with three entries. Info leads to a standard information box about the program. The Languages option leads to a submenu from which you can select any of the currently available character sets (i.e. those for which PolyGlot has been customised). Clicking on any of these will open a small window displaying the relevant characters for that language. You may have more than one country window open at a time. The Quit option terminates the application and removes its icon from the icon bar.
| Figure 1. PolyGlot's icon bar menu |
|
 |
When you move the pointer over a language window each character will highlight in turn. Clicking Select (the left-hand mouse button) over the highlighted character will cause that character to be inserted into any document or writable icon which currently owns the caret, just as if the character had been entered from the keyboard by holding down Alt and typing its code on the numeric keypad. You can therefore use PolyGlot with any other application which accepts keyboard input.
Because of the way in which the RISC OS Window Manager works, it is not possible to use this method to insert characters into menu items or non-static dialogue boxes, since any click of a mouse button outside the menu or dialogue box will close the entire menu structure. For this reason, an alternative method of entering characters from PolyGlot is provided. Simply position the pointer over the required character and press either of the Alt keys. This will result in the character being inserted into the menu or dialogue box exactly as if Select had been clicked over it as described above.
Please note that PolyGlot only displays the characters in its windows in the system font. However, when you select a character in a PolyGlot window, it is the ASCII code of that character which will be passed to the application owning the caret. This means that, when the character is inserted into the document, it will appear in whatever font is currently being used. Thus PolyGlot can be used in conjunction with any outline font. However, you should be aware that not all outline fonts have every character defined, so if you click on a character in a PolyGlot window and that character does not appear in your document, that is a shortcoming of the font you are using, and not of PolyGlot.
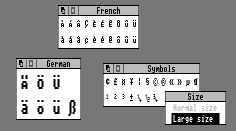
Clicking Menu over a language window offers the choice of a standard size or large size window. Large size displays the characters at approximately double size, so can be useful for clarity.
| Figure 2. PolyGlot windows in normal and large sizes, together with the window menu |
|
 |
The PolyGlot disc supplied with the package has been set up for use with French, German, Spanish and Symbols. One of the most powerful features of PolyGlot, however, is the ability to customise your own copy to suit your individual requirements. To customise PolyGlot, you will need to run an application called PGCustom, which is also supplied on the same disc. To use this application, open a directory viewer onto the disc in the normal way, and double-click on the !PGCustom icon. PGCustom will now be installed on the icon bar.
The icon bar menu (obtained by clicking Menu over the icon bar icon) has only two options, Info, which displays information about the program, and Quit, which terminates PGCustom and removes it from the icon bar.
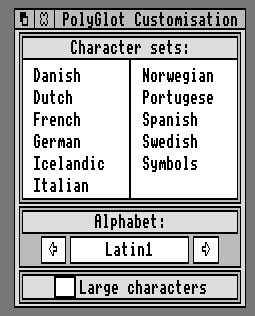
Clicking Select over the icon bar icon opens the main PGCustom window which will be used for the customisation process. This window displays a list of languages together with other information, which determines the alphabet which is to be used, and whether PolyGlot will start up with normal or large size characters. When you first run PGCustom, the information in this window will contain the default settings supplied with the disc, but these can be altered, as will be explained later, to enable PGCustom to start up with a different set of languages. "Languages" is a slight misnomer in this context, since it is not necessary for sets of characters to belong to any particular language. For example, symbols and currency signs could not really be called "languages". However, for the purposes of this manual, we will use the word "language" to refer to any generic name for a set of characters selected by the user.
| Figure 3. PGCustom's main window |
|
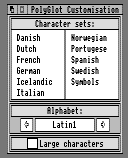 |
The default languages built into PGCustom initially are: Danish, Dutch, French, German, Icelandic, Italian, Norwegian, Portuguese, Spanish, Swedish and Symbols. The first ten of these are the languages whose characters are normally available in the Latin1 alphabet, while Symbols contains a number of the non-alphabetic characters in the Archimedes Latin1 alphabet which are not obtainable directly from keys on the keyboard. The default alphabet is Latin1, while the default window size setting is normal.
To insert a new language into the list, click Menu over the language entry before which the new item is to be inserted, and move across the Insert item option. A writable icon will appear, into which you may type the name of the new language. Please note that if the list is full (i.e. there are already 12 entries in the list), or if the pointer is not over an existing entry or the first available space in the list, the Insert item option will be greyed out and cannot be selected.
To delete a language from the list, click Menu over that entry on the list, and move the pointer across the menu option which shows the name of the language. Then choose the Delete option from the submenu which appears.
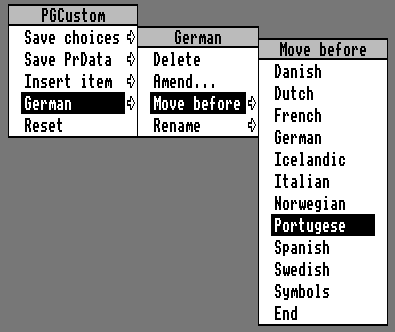
To move a language entry to a new position in the list, click Menu over the entry, and move the pointer across the menu option which shows the name of the language. Now move the pointer across the Move before option, and choose the language before which you wish the original to be placed in the list. For example, if your list has entries for Danish, Dutch, French and German in that order, and you wish the order to be Dutch, French, Danish, German, then click Menu over the Danish entry, move across to the Move before submenu, and choose German.
| Figure 4. The Move before submenu |
|
 |
To rename a language entry, click Menu over the entry, and move the pointer across the menu option which shows the name of the language. Now move the pointer across the Rename option and type the new name into the writable icon.
You can choose to display any characters you wish in each PolyGlot window, provided they are available in the Archimedes alphabet you are using. This means, for example, that you could make up your own collection of characters for a specific purpose, or in an educational situation you could restrict a foreign language to a particular range of characters to reflect the level of the pupils using the application.
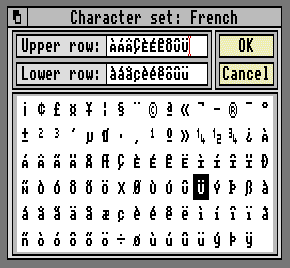
To edit the character set which will be displayed for each of the languages on the list, you can either click Select over the appropriate language in the PGCustom main window, or you can choose Amend from the submenu which appears when you move the pointer across the menu option which shows the name of the language. Either of these actions will open the character set window for that language.
| Figure 5. The character set window |
|
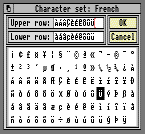 |
At the top of this window are two writable icons which show the characters currently configured for that language, as they will appear in a PolyGlot window. In other words, the upper icon shows the upper row of characters, and the lower icon the lower row. Each row can have a maximum of 12 characters. Below these writable icons are icons representing all the characters available from 161 to 255. These will be displayed in the alphabet which is currently shown in PGCustom's main window. Provided that the caret is in one of the writable icons, clicking over any of these further icons will insert that character into the set at the caret position. You can of course type other characters in directly from the keyboard; for example, you could have a "language" called Currencies, and in addition to the extra characters available in the window, you could also type in £ and $ from the keyboard.
When you are satisfied, clicking on the OK icon will register your choices, and these characters will be the ones which will be displayed in the PolyGlot window for that language once you have saved the customisation file (see section 3.5). Click on Cancel if you want to abandon the editing and revert to the previous set. If you click on either of these icons with Adjust instead of Select, the dialogue box will remain on screen to enable you to continue editing.
The lower half of the main PGCustom window shows the alphabet which is currently selected for use with PolyGlot, and a further icon which shows whether normal or large size characters are to be displayed when PolyGlot starts up. Clicking with Select or Adjust over the arrow icons on either side of the alphabet name will cycle through all the available alphabets on your Archimedes (with the exception of Bfont which is not strictly a foreign language alphabet). The alphabet whose name is displayed in the central icon will be selected each time you open PGCustom's character set window (and when you close it, the previous alphabet will be restored), and will also be stored in the PolyGlot customisation file along with the language and character data. This means that each copy of PolyGlot will be able to set the alphabet it requires when it is installed, enabling you to use PolyGlot with any of the available alphabets in the computer.
The icon entitled Large characters allows you to choose whether PolyGlot starts up by default with normal size windows and characters, or large size windows displaying the characters at approximately twice normal size. Clicking with Select on this icon will toggle the option on or off. When it is on, large characters will be displayed.
Before you can use these languages and character sets, you must tell PolyGlot which choices you have made. This is done by saving a customisation file inside the PolyGlot application directory, which PolyGlot will look for when it is installed. Open the application directory called !PolyGlot by double clicking on its icon in a directory viewer with the Shift key held down. Now click Menu over the PGCustom main window, and move the pointer across the Save choices option. A standard RISC OS save box will appear, with a default filename of PGChoices. This is the name which PolyGlot will look for, so you should now drag the file icon from the save box into the !PolyGlot application directory which you have just opened. The next time you install PolyGlot, it will now display the languages and characters you have chosen.
Any PolyGlot customisation file can be dragged to PGCustom's icon bar icon or to its window. This file will normally be a PGChoices file, as described above. Dragging a file to PGCustom will result in the settings in that file, i.e. the language entries, character sets, alphabet and character size information, being displayed in PGCustom's window ready for editing if required. This will overwrite any data already being displayed by PGCustom.
When it is installed, PGCustom looks for a data file within its application directory called DefChoices. This is simply a customisation file, as described in section 3.5 above. As supplied on the program disc, the DefChoices file contains 11 language entries, as listed in section 3.2, plus Symbols. Each time you run PGCustom, these will be the entries which are first displayed until you edit them. If you wish to start up with a different set, you should edit the language entries and character sets exactly as for a PolyGlot customisation file, but instead of saving the file as PGChoices inside the !PolyGlot directory, you should save it as DefChoices inside the !PGCustom directory.
If you choose the menu option entitled Reset, this will cause the DefChoices file to be read in, and all the settings in the PGCustom window will be restored to their defaults. Since this may overwrite data which you have been editing, a warning will be generated if you choose this option.
Printers cause more difficulties for the user than almost any other piece of hardware. There are many different makes of printer, and although most are described as Epson-compatible, nevertheless there are often significant differences between them with regard to the way in which they handle certain aspects of printing. This is especially true when it comes to printing international characters. The information in this section is necessarily technical in nature, and if you are not sure how to proceed it is a good idea to seek the help of a more experienced user. If you are using the application in a school, for example, you may find it useful to ask your I.T. co-ordinator for advice.
If you are printing from an application which uses outline fonts, then you will probably not need to worry too much about how your printer will handle the characters generated by PolyGlot. This will apply to most DTP packages, art or drawing packages, and even some spreadsheets and databases if they output text in outline fonts. This is because, when using outline fonts, the characters are sent to the printer as bit-image data; in other words, the printer is set into graphics mode and the characters are defined pixel by pixel exactly as they appear on the screen. This contrasts with text printing, where the ASCII codes of the characters are sent to the printer, which then interprets them according to its own software which is built into the printer. For outline font printing, then, you can safely ignore the rest of section 4.
Many word processors and text editors, as well as a number of other applications, will send textual output to the printer in text mode. In other words, the ASCII code of each character will be sent, together with any control codes needed to tell the printer to select such functions as bold, italic, etc.
To use PolyGlot effectively, the application from which you are printing must send its output to the printer using the standard RISC OS printer drivers. These are supplied on the Applications disc which accompanies every Archimedes, and are described in the User Guide. The purpose behind the use of printer drivers is to remove the need for applications to concern themselves with which type of printer is connected to the computer, and Acorn strongly encourages software writers to ensure that their applications can print in this way. The printer driver itself will normally be configured for the particular printer being used, to ensure that any codes sent to the printer will be recognised and acted upon. Again, if you are unsure about using printer drivers, or whether the driver you are using is suitable for your printer, do seek advice.
Acorn's release 2 RISC OS printer drivers, which are the latest versions, allow you to set up the printer driver so that, when printing in text mode, any ASCII character can be intercepted and replaced by a different character code, or string of codes. The main purpose of this is to enable non-English characters, and other non-standard characters such as the pound sign, to be printed correctly. Often this involves selecting another character set on the printer, sending the required code, and then returning to the default character set.
To make life more complicated, printers conform to a number of different standards with respect to international characters, and so it is not possible to produce one set of codes which will work with all printers. However, the design of the Acorn printer drivers makes it possible, with a little effort, to cope with most situations. A file within the printer driver application, called PrData, allows various code sequences to be specified for a number of different printers; when the driver is run, any one of these printers can be selected from a dialogue box, and the required code sequences for that printer will be read from the file.
As far as PolyGlot is concerned, the codes that the printer driver needs to incorporate are those which produce the correct result on the printer whenever the text contains a character which is not present in the printer's standard set. This may be achieved in a number of ways, depending on the printer. There are three common methods which are used by "Epson-compatible" printers.
With some printers, for example the Epson FX80, a handful of characters within the standard character set which consists of ASCII characters 32-126, can be altered according to which language is currently selected on the printer. For example, character 123 might produce é if French is selected, ä if German, or Å if Swedish. This method is simple, but does not allow all the characters available on the Archimedes to be represented.
An alternative method is for the printer to possess an additional character set, normally consisting of the characters from 160-255. This is usually referred to as the Alternate Character Set. Many printers use this area to implement the IBM character set, which is commonly used on PCs and consists of a number of international characters together with various graphic characters. There is in fact an international standard for this character set, which is sometimes referred to in printer manuals as Code Page 437. Printers which contain this set usually conform to the standard. Again, however, not all of the Archimedes' extra characters are obtainable.
The most comprehensive solution is available from printers which provide the ISO 8859 alphabet 1 character set, on which the Archimedes Latin1 alphabet is based. This is also known as Code Page 850. Virtually any character which is obtainable on the Archimedes using the Latin1 alphabet can be printed correctly on a printer which emulates Code Page 850. An example is the Canon BJ-10e bubblejet printer. The other Archimedes alphabets are also based on standard character sets - for example, Latin2 is based on ISO 8859 alphabet 2 (Code Page 851) - but it will probably be difficult to find a printer which supports these sets.
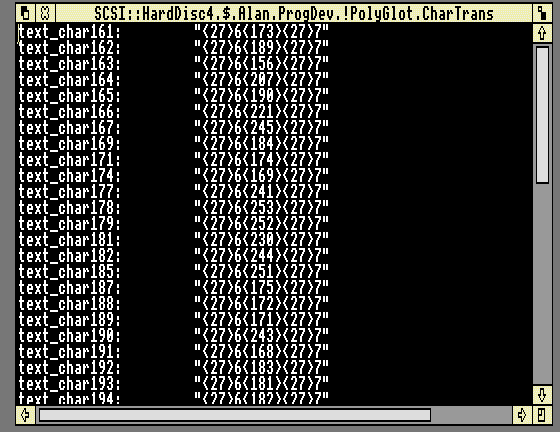
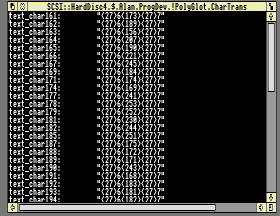
The three methods described above are the most common ways for dot matrix printers to handle international characters, and PGCustom is designed so that it will output a text file containing the alterations to be made to the PrData file for each of these three alternatives. Once you have completed your customisation and saved the PGChoices file, click with Menu over the PGCustom window, and move the pointer across the Save PrData option. A submenu will appear displaying four further options: Epson FX80, Page 437 (IBM), Page 850 and Undefined. Each of these leads to a standard RISC OS save box. Dragging the file icon to a directory viewer will save a text file containing a series of lines of text which must be incorporated into the printer driver's PrData file, as will be described in a moment. The default filename for this file is CharTrans, but any filename can be used, since the file itself serves no long-term purpose as far as PolyGlot is concerned.
In order to compile the text file, PGCustom first looks to see which characters are currently defined by the user as part of the customisation process. In other words, if the only language currently displayed in PGCustom's window is German, and the character set for German has been defined as the umlauted characters and the sharp s, then only these characters will be taken into consideration when compiling the CharTrans file. You should therefore make sure that you have completed the customisation process before saving a CharTrans file, since otherwise you may find that some of the characters you have chosen to be part of your PolyGlot character sets will not be printed correctly. Obviously you must decide before you save the file which of the three submenu options to choose, according to which method your printer uses for international characters. You will need to study the manual for your printer carefully in order to make this decision. If in doubt, you should seek advice from a more experienced user.
As mentioned earlier, the release 2 printer drivers allow you to intercept any character code and replace it with another code, or string of codes. In order to do this, the printer driver's PrData file requires a line, for each character to be intercepted, beginning text_charnnn: where nnn is the ASCII code of the character concerned. This is followed by a string contained within quotes which specifies what to replace it with. Printable characters (i.e. those within the range 32-126) are included in the string exactly as they stand, while non-printable characters are surrounded by angle brackets. Thus a typical line in the PrData file would be:
text_char188: "<27>6<172><27>7"
This means: intercept character 188 and replace it with a string consisting firstly of Escape (i.e. ASCII 27) plus "6" (i.e. ASCII 54). This sequence sets the alternate character set. This is followed by character 172, which produces the required international character in the alternate set. Finally Escape plus "7" sets the printer's character set back to normal.
If your printer uses one of the three methods described above, and if the control codes it requires to do this are the same as the majority of printers, then PGCustom will automatically generate the necessary data for incorporation into the printer driver's PrData file.
The Epson FX80 option assumes that your printer uses ESC "R" to set the required international language. Thus a typical line from the CharTrans file would be:
text_char196: "<27>R<2>[<27>R<0>"
This sends ESC "R" 2 to set the German language, then ASCII 91 (which is normally the "[" character but in the German set produces Ä), and finally ESC "R" 0 to reset the language to USA. Note that if you normally have your printer set up with a different default set, you will need to manually amend the CharTrans file. For example, if your preferred default set is UK, you must replace all the zeros with 3.
The Page 437 and Page 850 options both assume that ESC "6" is used to set the alternate character set, and ESC "7" to reset to normal. An example of this was given above. This code sequence is fairly standard on most printers, but if yours requires a different set of codes, you must alter the CharTrans file before using it.
The Undefined submenu option is for use if your printer supports none of these three methods of producing international characters. The file output by this option contains only the start of each line, i.e. text_charnnn:. You will have to ascertain from your printer manual what codes are necessary to achieve the required result for each character.
| Figure 6. A section from a typical CharTrans file output by PGCustom |
|
 |
The RISC OS printer drivers contain a help file which gives some information about the PrData file, and you should read this before attempting to alter the file. To complicate matters, PrData itself has been compressed in order to save space when the printer driver is loaded, and the file you must in fact modify is the source file, called PrDataSrc, from which the compressed version is generated. If you load PrDataSrc into a text editor such as Edit or DeskEdit, you will see that it contains a number of sections. The first few contain various default and global settings and you do not need to alter these. Further down you will see a section headed "Real printer definitions", and below this are a number of printer definitions, each separated by a line of dots and starting with the printer name.
Among these you will find the printer definition that you use for your own printer. If you are not sure which definition you are currently using, install the printer driver on the icon bar in the usual way, then click Select over the icon bar icon. A dialogue box will appear, at the top of which is the name of the printer definition currently in force. This is the definition you will be using, assuming that you do not normally alter this each time you run the printer driver application (you can do this by clicking with Select or Adjust over the icon containing the printer name).
Having found the correct printer definition, you must now add the whole of the CharTrans file which has been generated by PGCustom. The position of the new lines in the PrData file is not critical, although you will probably find it easiest to add them at the end, just before the line of dots separating the definition from the next. Position the caret on a new line in the PrDataSrc document, and then simply drag the CharTrans file icon from its directory viewer into the text editor window. Finally, save the amended PrDataSrc file, and follow the instructions in the printer driver's help file to compile your new compressed PrData file.
PGCustom now has some shell DefChoices files to help you set up PolyGlot with alphabets other than Latin1. These are inside the !PGCustom application directory and are called DefChoice2, DefChoice3 and DefChoice4. These contain the lists of countries supported by Latin2, Latin3 and Latin4 respectively. The characters for these countries have not been defined.
To use these files, simply rename the existing DefChoices file as DefChoice1, and then copy or rename the file you want to use as DefChoices. Next time you run PGCustom, this will act as the default file.
Version 1.02 - 9 January 1992